
Unit Entry - File Upload

Thank for your purchase of a new HandyTrac system! Before your system is shipped, units will need to be submitted as part of the set up process.

The first steps in this guide will detail setting up your file, then we will go through uploading the file and the final submission process. Once your file is ready, uploading and finalizing your units only takes a few minutes.

You have the option to upload XLS, XLSX, or CSV file types to submit your units. This guide will detail setting up a file in Excel.

Setting Up Your File and Uploading Units

Unit Entry File Requirements

  1. Your file must contain the full list of the unit keys you want to add to the system.
  2. It is highly recommend you create key groups as well. Common types of key groups are buildings, floors, or streets.
  3. Each unit name must be unique. If you have units with the same name in multiple locations, the name must be modified. How to do this is detailed later in this guide.
  4. Remove any extra heading information such as property information and any footer information such as totals, pricing, etc.
  5. The file must be saved in an Excel format (xls/xlsx) or CSV. Word documents, PDFs, and pictures cannot be uploaded.
  6. The units must be listed on the first sheet in an Excel workbook.

During the upload process you will be selecting which column contains your units and which column contains your groups. Your columns do not have to be in a specific order or have a specific name.

Setting Up the Unit Column

The most important column is your list of units. The names of the units are what you select when requesting a key in your system. Each one must have a unique name. Making names unique will be covered in a later step.

At this stage, make sure every unit in the column meets the following criteria:

  1. Unit names can contain only the following characters:
    1. Letters
    2. Numbers
    3. Spaces
    4. Periods
    5. Dashes
  2. The maximum length for a unit or group name is 10 characters.

Edit unit names that do not meet the criteria.

  1. Shorten long names.
    Example: Change “Maintenance Shop” to “Maint Shop”
  2. Remove unsupported characters.
    Example: Replace underscores ( _ ) with dashes ( – ).
    Use the “Find and Replace” feature in Excel to quickly replace characters. (Home Tab > Find & Select > Replace)
  3. Capitalization does not matter. All names will be converted to uppercase characters.

Your system was purchased for a specific size. If your system size is 250 hooks, you can include a maximum of 250.

If you do not enter the maximum possible number of units, the unused space will be available for extra units in the future.

Setting Up the Key Groups

Key groups allow you to quickly request the entire group of keys at once instead of doing individual key requests. This feature makes tasks such as inspections and pest control much quicker.

During a typical key pull, key groups can also help you quickly filter your unit list to make locating keys even faster.

In a column near your units, group your keys by entering a group name. If your units are grouped by buildings, floors, streets, etc. then use that column for your groups. Group names can be up to 10 characters in length.

In the following example, the “Group” column contains the names of my buildings. In this case, the groups are buildings 4700, 4702, etc. and each contains 6 unit keys. For this guide, I have renamed the building column to “Group” for clarity.

Making Sure the Units are Unique

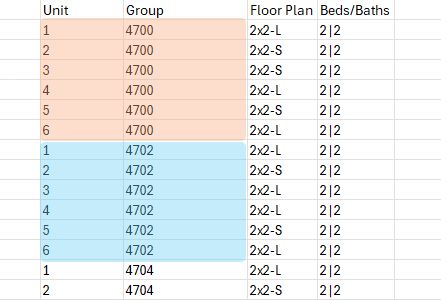
As mentioned, the unit names must be unique. In the example above, you can see that the units are not unique as multiple units are named 1, 2, etc. A way to resolve this issue is by adding in the group to the unit name.

Since each unit only occurs once in each group, a combined column that has the group and unit will make it unique.

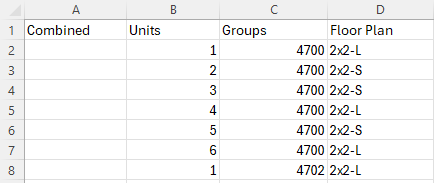
We can use a simple formula to combine the unit and group columns.

1. Insert a new column.
2. I will name it “Combined”.


3. In row 2 of the new column, enter the following formula: =C2&B2 then press Enter.


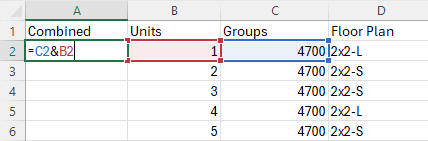
Explanation: This basic formula will take cell C2 and combine it with B2, in that order, by using the “&” operator.* You will need to adjust your formula to select the correct columns and cell. 

4. The result of the formula will be shown as a unit called “47001”. Click and drag this formula down the rest of the column using the Fill Handle (the small square at the bottom right corner of a selected cell).

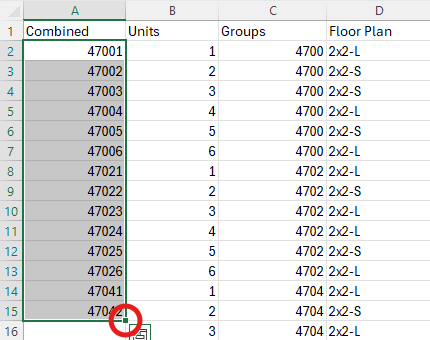
*You can use “&” multiple times in the same formula for adding additional characters. As an example, =C2&”-“&B2 will create a unit called “4700-1” by adding a “-” between the cells. 

Saving Your File

Once complete, save your document to a new file. Remember that your list of units must be on the first sheet in the workbook.

If you are unable to save in a standard Excel format of XLS or XLSX, you can also export your spreadsheet as a CSV file.

Refer to your spreadsheet software’s documentation for how to export a CSV file. If given the option, the file must be “comma delimited”.

Uploading Your Units

  1. On the Unit upload page, click “Upload Units” and select your file.
  2. Click Next.

Supported file types are XLS, XLSX, and CSV.

Select the Units Column

  1. Make sure the unit data preview is correct before continuing. If any data appears inaccurate or corrupted, double check your file settings and click Back to re-upload a new file.
  2. Click on the column that contains your list of units.
  3. Click Next.

Select the Groups Column

  1. Click on the column that contains your Groups.
  2. Click Next.

If you are not adding Groups, click “Skip” at the bottom right. While you do have the option to skip, it is highly recommend you include Groups. Adding Groups at a later time will incur a reprogramming cost.

Confirm Units and Groups are Correct

  1. Double-check that the correct Unit and Group columns were added.
  2. Make sure the total count is correct.
  3. Click “Yes, This is Correct”
  4. You will be notified how many extra locations are available.
  5. Click Next.

The list of units may be sorted differently than how you entered it. This does not affect your system in any way. It is only important that everything you need is included in the list.

Finalizing Unit Submission

  1. Select the number of employees that will be using the system.
  2. Click Next.
  3. If you have any changes to make, go back to the relevant steps. This is your last opportunity to make changes to units or groups before your system ships. Basic changes can be made once the system is installed, but large changes may incur a reprogramming cost.
  4. Click Finish and Submit Units

Reach out to your sales representative or HandyTrac support with any questions.